Monday, January 18, 2016

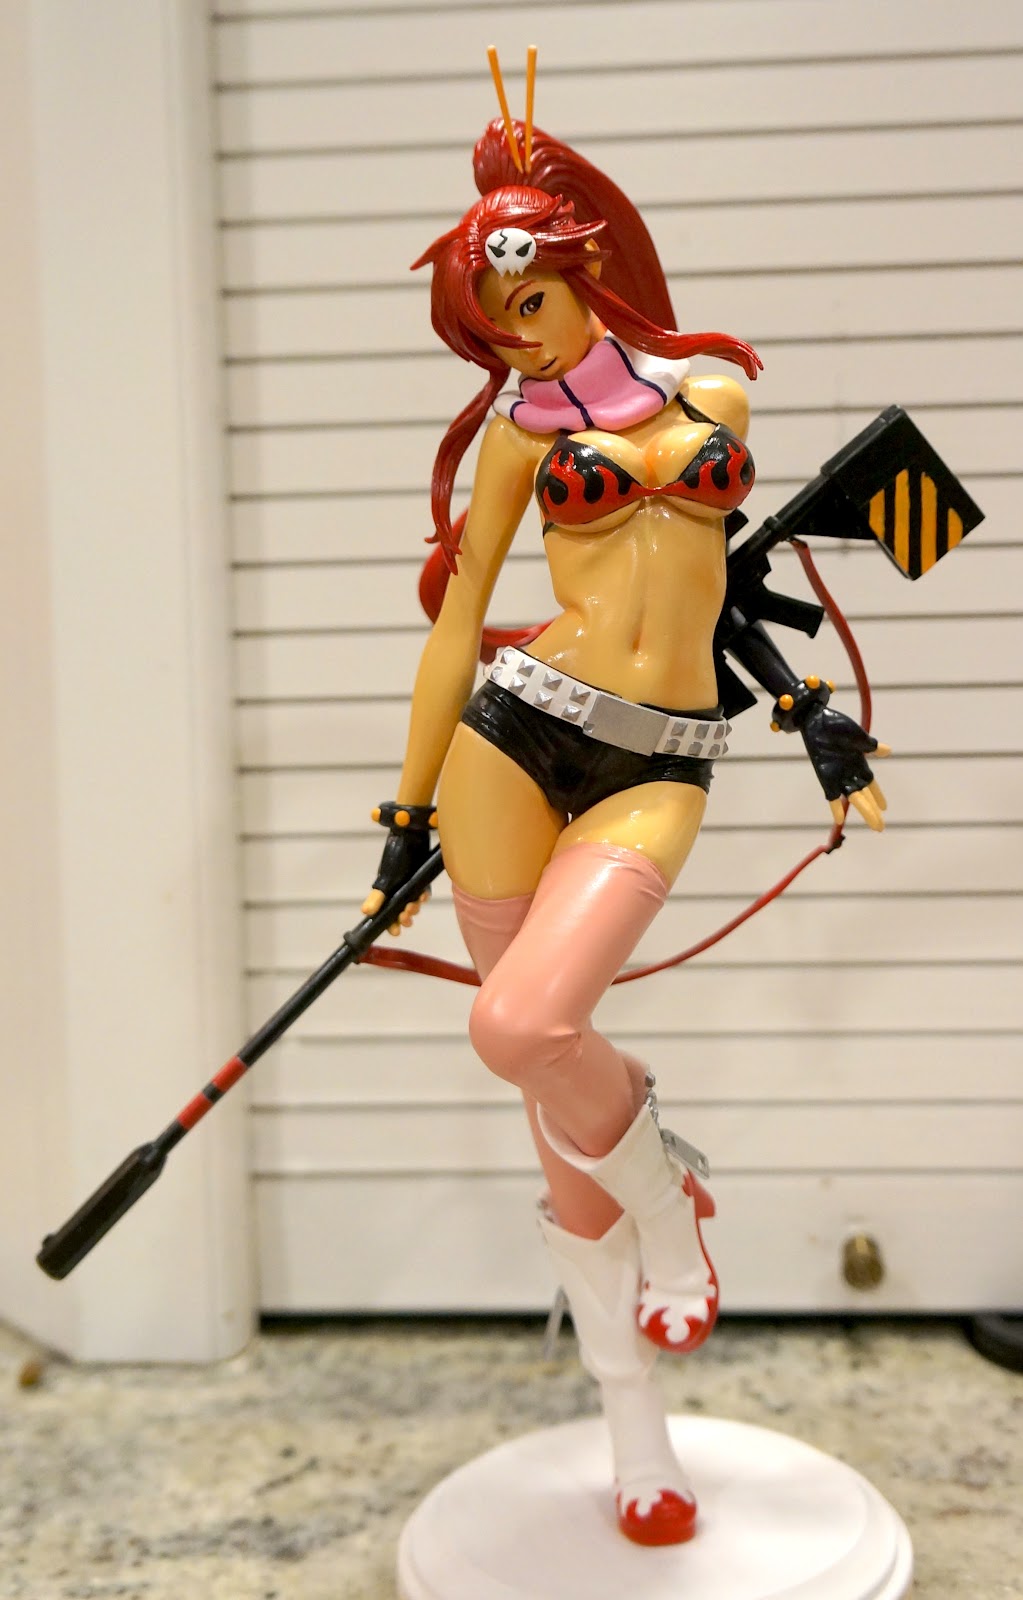
Realistic Yoko - Tenth figure, first real airbrush

I'm not a huge Gurren Lagann fan. Actually, I've only seen the first 5 episodes. But I REALLY appreciate realistic figures. So, since I knew the character and they had one for sale, I decided to do her.

This figure marks the starting point of me using the airbrush extensively. Previously, it was used for only a part or two, but this time, it was used everywhere it was feasible. So, obviously, I had a lot to learn about airbrushing, and I certainly did. Actually, most of the hard lessons had NOTHING to do with airbrush painting skill, but to do with the equipment and processes.


I'd had a few learning experiences before her, with Devil Lady and Etna, so I wasn't a complete noob with the airbrush. That's not to say I didn't make plenty of mistakes and learn a bunch. The biggest thing I learned was how to shade properly with the airbrush. For me, I paint a base layer of a 20% darker skin color. Then I paint the shadows. Then I 'fix' it a bit with another layer of the 20% darker skin color. Then I add the highlights. Then I go back with the final 'real' skin color to tone down the highlights and any remaining shadows. After watching a youtube video, I tried skipping the first step, but I just didn't get the same results, even though it did work.


I haven't really been using a primer for a base coat. I hadn't needed it so far. So this time, when I went out to start airbrushing, I noticed that certain figures really really beaded up when I sprayed them. Of course I knew the reasons, but I was still lazy and tried to get away with just doing a few thin layers at first before laying it on thick. This works, but the problem is that the paint will chip off even from light handling - - it's kinda ridiculous how easy it was to chip this stuff off. I was already done with the base layers of paint on this figure before I decided to stop trying to skip the primer.

Lesson 26: Don't skip the primer when using airbrush


I made plenty of mistakes airbrushing her - mostly with masking. It turns out that the 'blue' tape I was using is too sticky and would often rip off the paint it was taped over. Obviously this was a hug hassle. I learning early that I was better off not letting the tape stay on longer than it needed to. I also purchases some Tamiya masking tape at the very end of the project, and discovered how wonderful and perfect it is. 

Another lesson I learned here with airbrush paint - you HAVE TO use a primer. really really. No more skipping it, like I could with the handpainted acrylic. Oh well.


I STILL noticed a lot of beading up with the primer itself, which I thought was supposed to stick to just about everything. I noticed that the Tamiya primer spray, while much finer than my cheap sandable auto primer, was having a hard time 'sticking' to the figure. The sandable auto primer was better, but still beaded up some. I knew this was due to oils or casting residue on the figure parts, but I'd always managed before, so I tried to force it. All in all, after much effort and not so great results, I can only say that I have decided to soap all my parts from now on. Unfortunately, again, this figure didn't benefit from this new policy.


Lesson 27: Don’t skip the soap wash. Let sit in a degreaser overnight and wipe it off. Even a little bit will really help on bad pieces. I found that not all pieces had a problem, so on some, it didn't make a difference.

I've really grown used to doing my figures in a production line style rather than in a series. I take several figures, prep them all together, wash them all together, paint all the similarly colored pieces together, and only then do I pick one to complete before moving on to the others. This parallel production has it's pro's and con's - the main pro, being that when using an airbrush, I have to clean it less. The main con here, would be that since I'm still in the learning process with the airbrush, when I fail, I fail across multiple figures, instead of having only messed up on one. I mention this, because that is exactly what happend during the production of this figure. As it turns out, I really don't like the skin tone I chose. Or rather, I think the tone fits ok for this figure itself, but since I did 4 in parallel, the three other figures also go this same skin tone - - however, it doesn't look right on any of those characters. Now, I have two choices: spend a LOT of time to sand them all down, or just go with the color. I'm fairly certain that I'm going to sand them down, but I don't even want to think about how much time it's going to take. 

So, Lesson 28: if you are still learning, don't try to shortcut parts of the process: take every figure as a chance to learn.


Another huge hassle here was with the finish. Because the paint kept coming off (bad tape and / or no primer), I put a clear finish on it. However, I kept on having bad luck. The first finish I used dried YELLOW!! omG!! Not only that, but it made the paint crack!! Krylon clear matte finish sux!! I tried another Krylon: Low odor matte finish, and got better results: it dries clear enough, but it still has a problem with tearing up. I'll continue using the Krylon Low Odor finish, but just be much more careful not to spray too much. OH! and NEVER spray a layer of finish, a layer of paint, and then another layer of finish!! You'll regret it.

9th figure - first airbrush, Etna from Disgaea

I've always had a thing for Etna. I already own this figure, the real one, but I still wanted to paint her myself. Since I like her so much, I should have waited till I was better with the airbrush, but alas, she was my first - which means I really had no idea what I was doing.

Since this was my first experience using the airbrush, I didn't try to do anything fancy with it. Or rather, I should say that I tried, but quickly decided to cover up my attempt with solid color instead. After a bit of practice, I added a highlight to the hair and wings (which can barely be seen) and did a gradient on the tail. I was too scared to attempt shading the skin (the skin being the most important part of a figure, IMO). But I did use the airbrush on the shoes, which are just two colors - but that's enough for me to have to mask, so just in case you haven't been paying attention, this is (was) my first masking. After the shoes I did the legs, which was my second masking, but my first where I really cared about getting it precise. So I taped them up, painted them, and left them on the desk for a week. When I got back to them, the tape was hard core stuck to the paint and I was forced to rip up an awful lot of paint. 

Lesson 24: Don't let tape sit. Once the part is dry enough to handle, get the tape off


Her hair, tail, and her skin were airbrushed very simply. Her skin was actually airbrushed AFTER I hand painted it and decided I didn't like it. She shoes were also airbrushed. The wings were a weird mixture of airbrush paint (red) and acrylic to blend into the skin. It's hard to see, but I really tried hard with the blend and it actually looks really good in person.


I hand painted the purple because I didn't have a way to 'pearl-ize' the airbrish paint, but I did for the acrylics. It didn't even occur to me at the time that I could have used the acrylics in the airbrush. Anyways, the hand painting makes the skirt look a bit too 3D, which throws off the whole figure a little bit.

The eyes were simple and done easily (yay, another success). All in all, I'm happy but not thrilled with the results. I really wish I would have waited another month to do this one, to get more experience. As it is, the only real deficiency she has over the real deal, is that I have much less shading. 


I found out that even getting the tape off fast won't fix the problem entirely, but it really really helped. But when you're going for perfection, little things like those chips being pulled up by the tape can double or triple the amount of time it takes to paint a figure. I truly hate it. Part of my problem as well was that I was using painters tape from my local hardware - the blue one, not the green one. Apparently, I was causing myself heartache for no good reason because as I only recently discovered, the Tamiya masking tape is PERFECT - it cuts easy, doesn't stick too much to the paint, but I've still never had a problem with paint leaking under it. Honestly, paint leaking under it is better than it sticking too hard and ripping up paint, so even if it does allow some to get under it, I really don’t care; I'm never going back to the hardware store tape.


Lesson 25: If Tamiya sells a version of it, the buy the Tamiya version!

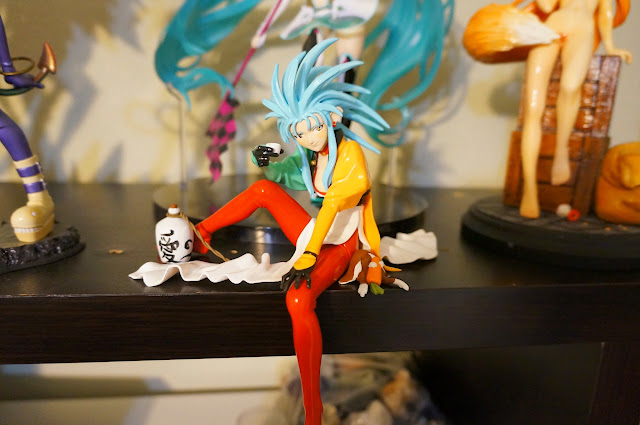
8th: Ryoko from Tenchi Muyo

Tenchi Muyo is one of my all time favorite animes. And of all the characters from that show, the only decent figure I could purchase was that of Ryoko. Even this figure is a bit boring, but at least it isn't as bad as some of the Ayeka's out there.


The legs on Ryoko took FOREVER because I had to paint 8 or 9 layers of red acrylic before I got a nice solid color. This is the figure that convinced me that it was time to buy an airbrush and compressor. With an airbrush, this figure would have been super simple - but without it, it took forever to get enough layers on the parts for a flat color. I think it was great for practice and to up my painting skills, that I started out with hand painting; but any serious figure painting has to be done with airbrush, and it was time to move on up. So after I finished this figure, I bought one.


As happy as I am to have a Tenchi Muyo figure, there is nothing particularly exciting about this piece for me. It's rather simple, and not particularly sexy. The only real thing I'm happy with here was another perfect eye job. Maybe an even better one than the last figure (Rei).


Favorite so far: floating Rei Ayanami

I did this one simultaneously with the Devil Lady, but started it a little after, so this would be the 7th figure. First thing I learned here was that there was no way I was going to paint a plug suit with acrylic paints, so I decided to use a white primer spray instead. It worked out really well! The primer was super easy to use and of course never chipped off like some airbrush paints might. Even now, after a few figures having used an air brush, I still go back to using primers if I ever paint white.

 Nothing tricky done here - just good ol fashioned patience. The most difficult thing, however, were all the thin lines on her plug suit. It took me a very long time to get it right.


Rei was my first real success painting the eyes. I watch a video on youtube, and poof, perfect eyes! Thanks Internet People!
Again, I love the even and perfect white texture of the plug suit.